Onboarding
See also a YouTube video on Onboarding for a single applicant here:
The Onboarding panel in COHO has been designed as an easy to follow 6 step process. When you’re ready to begin a new onboarding of a new tenant you can navigate to the Onboarding panel and click ‘Onboard new applicant’.
Onboarding a new tenant can also be used in conjunction with Tenant Find. See also Tenant Find.
It is important to note that when you click to ‘Onboard new applicant’, the onboarding begins with the first 3 steps only - Holding Deposit - Application - Referencing. There is a natural pause here to allow for the tenant to accept the Onboarding invite and follow the steps required.
Onboard new applicant
This is the starting point for onboarding a new tenancy. When you complete this form we will invite the applicant to COHO and take you both through a step by step process you can design and control, optionally including a holding deposit, an application form, referencing, creating a rent schedule, signing a tenancy agreement and paying any move-in monies.
Property: Here you can select the property the tenant is to be onboarded to. Once a property has been selected, you will have the option to make a grouped tenancy;
Room: Here you can select the room the tenant is being onboarded to.
We will only display available rooms or you can use the checkbox to include unavailable rooms (occupied rooms). It is good practice to ensure you set a move out date for an active tenancy before starting to onboard a new tenant into a room that is currently occupied. See also Tenancy Summary & Information.
Lead Tenant:
Select existing tenant: If you already have a record of the tenant on your account, you can recall the information you currently hold about them.
NB. It is worth noting at this stage you're able to state if the tenant is a residential tenant or a commercial (company) tenant by clicking the 'Change' link.
When selecting the 'Change' link, you're able to add information regarding a company rather than a person.
First name: Enter the first name of the tenant.
Surname: Enter the surname of the tenant.
Email: Enter a valid email address for the tenant.
Mobile number: Enter a valid mobile phone number for the tenant.
Click ‘Continue’ if you intend to onboard one person only.
or ‘Add another tenant’ if you intend to onboard more than one person into the room or property. Please note, if you intend to onboard a group of students or a couple, you will need to make a grouped tenancy first and then add the additional tenants on their own Onboarding but add them to the group you have already created.
Tenancy type
Fixed Term: The tenancy starts with a fixed term and becomes periodic at the end of the fixed term.
Move-in date: Enter the date the tenancy started using the calendar or by typing the date in the correct format.
Fixed term ends: Enter the date the fixed term period ends using the calendar or by typing the date in the correct format. You can also use the drop down box to specify a period of time i.e., 6m, 12m etc.
Periodic: The tenancy will be periodic from the start with no specific end date.
Move-in date: Enter the date the tenancy started using the calendar or by typing the date in the correct format.
Starts periodic: No end date is set.
Fixed Term only: The tenancy only lasts for a fixed term and will not automatically become periodic. The move out date will be set from the start of the tenancy and the tenancy will not automatically become periodic. If there is a change in terms you can edit this from the tenancy page. See also Tenancy Summary & Information.
Move-in date: Enter the date the tenancy started using the calendar or by typing the date in the correct format.
Move out date: Enter the date the fixed term ends using the calendar or by typing the date in the correct format. You can also use the drop down box to specify a period of time i.e., 6m, 12m etc.
Rent: This is the amount of rent you’re expecting to charge for the room. This will default to the rent amount set against the room but you can change this to represent the agreed rent amount for this tenancy however, this will not change the rent amount recorded against the room. See also Property Marketing, Property Details & Room Details. You can also change the frequency of the rent to be paid for this tenancy using the drop down box. The options include: per month, per week, per fortnight, every 4 weeks, per quarter, per term and per year.
Vat is not applicable: Use the 'Change' link to make any changes.
Tenant Money held (e.g. Deposit): Here you can specify if money is to be paid to secure the room. You can select the type of money held from the drop down box. The options include: None, Deposit Protection Scheme, Deposit Replacement Scheme, Lodger Deposit, Rent in Advance (i.e., last month's rent) or other.
Are bills included?
Included: All bills are included in the rent amount. COHO will not ask if there are any additional bill costs to add to the expected monthly payment.
Arranged by tenant: The rent does not include bills. Tenants handle all bills directly with suppliers. COHO will not ask if there are any additional bill costs to add to the expected monthly payment.
Collected by manager: The rent does not include bills. The Manager pays the bills, and the tenant pays the balance to the manager. For each rent COHO will ask how much must additionally be paid in bills. If you're using COHO to track rent collection, you will be prompted to set the bills for each rent payment due.
Are the Rent Schedules and Payments tracked in COHO?
Manage in COHO: COHO will track rent due and payments. See also Rent Schedules & Rent Collection.
Manage Externally: Rent is tracked externally, and you do NOT want to add this information to COHO.
Ia guarantor required?: Here you can specify if a guarantor will be required to secure the room.
Creating a Grouped Tenancy
See also Creating a Grouped Tenancy. If you intend to onboard a couple and want both parties to sign the AST or a group of students into a property and want all parties to sign then you will need to complete the following steps:
Step 1. Start the onboarding with the first tenant. You will need to ensure you have selected 'Do you intend to group this tenancy?; - Yes. Complete the basic details, Holding Deposit, Application Form and Referencing steps.
Once the steps have been completed, you will see on the Onboarding panel that next to the first tenant, there will be the grouped icon:
Step 2. Click to 'Onboard new applicant' to enter the details of the next tenant. You will notice that once the property and room have been selected, there is a statement to say that 'there is currently 1 other in a grouped tenancy':
Step 3. Complete the information for the next tenant. You will notice that certain fields are fixed as these relate to the information entered for the first tenant.
Step 4. Once the first stages of the onboarding have been added, you will then see this next tenant as part of the grouped tenancy on the main Onboarding panel:
Step 5. Repeat the process for any further tenants that are also part of the grouped tenancy.
Step 6. You will then be able to progress the Onboarding as usual taking each tenant through to the Tenancy Agreement stage and have all tenants in the group sign the same tenancy agreement and acknowledge the same compliance documents. Please note, if you are using an AST that has been uploaded to COHO with the mail merge tags, you will need to ensure you have all tags that are required to capture all the details of all of the tenants involved in the group. See also Tenancy Agreement Templates & Mail Merge.
Holding Deposit
The holding deposit is a sum paid to you by someone to show they’re serious about taking up a tenancy in your room/property. Once the holding deposit is paid, you commit to stop accepting offers until you receive the full deposit and the contract is signed, or for an agreed period of days. Holding deposits are usually non-refundable, and are deducted from the first rent payment. According to the Tenant Find Fees Act 2019, a holding deposit cannot exceed one week's rent.
See also GoCardless User Guide for setting up direct debits and collecting Holding Deposits and Move-in-monies.
Amount: This is the amount of money you expect to receive as the holding deposit. COHO will work this out for you based on the rent amount entered. You can amend this amount and COHO will warn you if it exceeds one week's rent.
Payment Instructions: These are the payment instructions for the tenant to pay the holding deposit to. Payment instructions can be entered onto the system and then stored for future onboardings. If you have already stored payment instructions on your account, you will be able to select from a list of stored instructions. See also GoCardless User Guide.
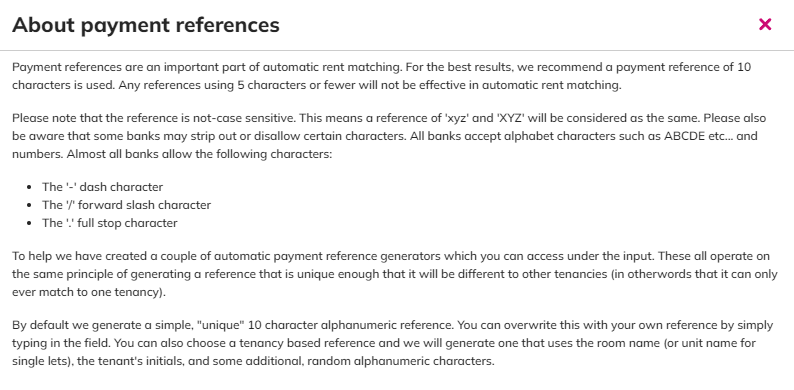
Tenancy Payment Reference: This is the unique payment reference that is sent to the tenant to use when paying the holding deposit.
Room held for: This is to state the number of days a room will be held for. COHO defaults to 7 days but this can be changed as per the agreement with the tenant. Processing any other viewings / onboardings during this period is left to the managers discretion.
Include additional ‘Deadline for Agreement’ terms: Setting this to ‘yes’ adds an additional checkbox which will be presented to the applicant, who will then be unable to proceed until they have confirmed the following:
“I/We agree that the ‘deadline for agreement’ will be the start date of the tenancy on DD/MM/YYYY and we agree that, whether by our request or that of the landlord or his agent, the tenancy start date is moved that the ‘deadline for agreement’ date will also be moved accordingly to the new start date”
An example of the holding deposit panel shown to a tenant including this wording is shown below:
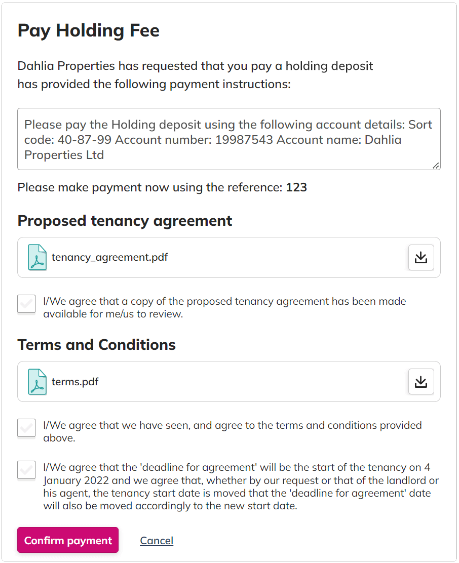
Include draft copy of tenancy agreement: Setting this to ‘yes’ will allow you to select an existing tenancy agreement template, which will be presented to the applicant, who will then be unable to proceed until they have confirmed the following:
“I/We agree that a copy of the proposed tenancy agreement has been made available to me/us to review”
Include additional Ts&Cs: Setting this to ‘yes’ will allow you to add additional terms and/or files, which will be presented to the applicant, who will then be unable to proceed until they have confirmed the following:
“I/We agree that we have seen, and agree to the terms and conditions provided above”
Application Form
If you require an application form to be completed, you can create one or more application forms for your organisation, choosing what questions you would like to include on each form. Any details captured on the application form will be pushed into the referencing step (should you use it) avoiding delays with starting referencing.
If the Tenant Find viewing process has been used and a pre-qualification questionnaire has been sent to the prospective tenant, the pre-qualification questionnaire answers will be pushed into the application form stage of the onboarding. See also Tenant Find.
When you onboard an applicant you can choose which form they should complete, or create a new one.
Application form name: Enter the name of the application form. This will help you identify which application form you need to use during an onboarding.
Mandatory Questions: Forename, Surname, Email and Mobile Number are mandatory questions and are always set for every form.
Optional Questions: Checkbox options include: Date of birth, Gender, Current address, current address, National Insurance Number, Next of Kin, Current Landlord details, copies of recent bank statements, Proof of Identification and Collect Right to Rent Proof.
History: Checkbox options include: Ever bankrupt, Any CCJs and Any criminal record.
Employment details: Checkbox options include: Employment type & annual income and Employment Status.
Add additional questions: Here you can add as many additional questions as you wish.
Additional files: Here you can include any files related to the application process during the onboarding.
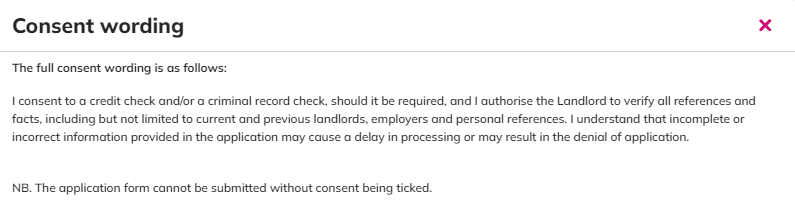
Consent & Declaration: See the full wording for Consent & Declaration below:
Declaration Wording:
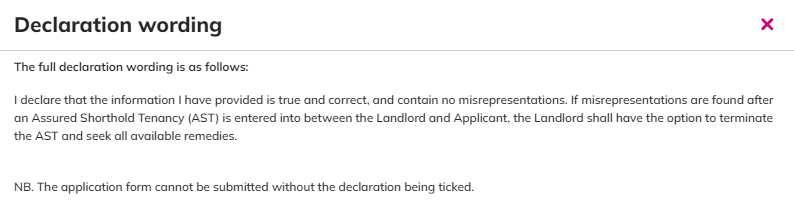
NB. The application form cannot be submitted without consent being ticked.
Click ‘create’ to create the application form or ‘cancel’.
Application forms can be created ahead of an onboarding by clicking on the settings cog on the Onboarding panel. See also Onboarding Settings Cog.
Referencing
When you include a referencing step in an onboarding it introduces a pause in the process to allow you to conduct the referencing.
You can either process the application data internally, obtain an external reference, or use one of our partners.
You can always decide to skip referencing when the time comes (or upload your own reference). Once the applicant has completed the proceeding steps they will be told they are waiting for the referencing to be started.
If you do require referencing during an onboarding you have a few options to how it is completed.
It is important to note that after the Holding Deposit, Application Form and Referencing options have been entered, the system will send the applicant an email with a unique link to click. The link will prompt them to create a profile on COHO that links to the onboarding. On their Onboarding dashboard they will see the Holding Deposit, Application Form and Referencing steps to complete. See also Tenant Onboarding Dashboard.
Your Own Referencing: This can be in the form of ‘in the office’ referencing or using a 3rd party outside of COHO. You will be able to ‘Provide Results’, ‘Request Files’ or ‘cancel’.
COHO Referencing Options:
Advanced Rent
COHO has an integration with Advanced Rent. This is a full reference and includes:
- Credit and affordability checks
- Employment / income verification
- Landlord / agent reference
- Address history and previous names
- 6-year credit history, CCJs, insolvencies
- Guarantor validation (if required)
- KYC / AML, PEP & santions screening
A sample report can be viewed here - https://coho-public.s3.eu-west-2.amazonaws.com/misc/documents/ADVANCED_RENT_SAMPLE_REPORT_WITH_GUARANTOR_23_FEB_2023.pdf
Canopy
COHO has an integration with Canopy. Canopy offer two referencing options:
Credit Check:
- Name, date of birth, address history
- Credit check (CCJs, IVA, bankruptcy etc)
- Credit bureau identity authentication
- KYC / AML, PEP & sanctions screening
Essential Check:
- Everything in Credit Check
- Income verification
- Rent payment history
- Rental affordability verification
- Manual document checks (48 hours)
- Identity and fraud prevention
Tenant Onboarding Dashboard
Once the Holding Deposit, Application Form and Referencing options have been entered, the system will send the applicant an email with a unique link to click if they have not already created a COHO account.. The link will prompt them to create a profile on COHO that links to the onboarding. On their Onboarding dashboard they will see the Holding Deposit, Application Form and Referencing steps to complete.
The tenant will be able to expand each section and see information about each one and also be prompted to provide information or complete an action where required.
Anything that is shown as green is completed. Anything in orange is waiting for the manager to complete something. Anything that is pink is waiting for the tenant to complete something. See also Tenant Onboarding Dashboard.
Tenancy Agreement
The tenancy agreement step is broken down into 2 stages - Generate Rent Schedule and Create Tenancy Agreement.
Generate rent schedule:
The system uses certain information that has been entered at the point of clicking to onboard the new applicant, to generate a rent schedule. It will use the rent amount, frequency and tenancy start and end dates. See also Rent Schedules & Rent Collection.
Rent Frequency Options: Here you will have fields to complete that will differ depending on what frequency the rent is being paid. For example, monthly allows you to choose which date in the month. Weekly will allow you to choose which day of the week etc.
Payment Method: This is for you to record and outline to the tenant how the rent payment is to be received.
Payment Reference: This is for you to record and outline the payment reference that the tenant is required to use to pay their rent. COHO is able to generate payment references for you. This is particularly useful if you’re choosing to use automated rent reconciling later on. See also Transactions.
Once the above fields have been entered, you will see the proposed rent schedule.
+Add rent record: Here you can add additional rent due records onto the rent schedule.
Regenerate: If any changes are made, you can regenerate the rent schedule to have the changes take effect. If you have added rent due line items, regenerating the rent schedule will remove these items.
Clear: Will clear the entire rent schedule.
Copy rent schedule to others: Here you can copy the rent schedule generated to other tenancies.
Individual rent lines can also be deleted or edited.
Create Tenancy Agreement:
How should this agreement be signed?
COHO eSignature:
When you upload a tenancy agreement to be signed, at the appropriate point in the process there will be an eSignature by the applicant, the manager and guarantor if one has been requested.
This will result in a ‘Verified eSignature Receipt’ containing acknowledgements of all the prescribed information you have added to COHO as well as the signature and identity verification details of both parties.
The COHO eSignature pricing can vary according to your subscription plan. Pricing is based on a per envelope basis which includes: the AST being signed by the applicant, guarantor signature if required, where you have added compliance documents to the property, COHO will include the latest version automatically for: GSC, EPC, EICR, HMO License (if applicable) and will also attach a copy of the latest How To Rent Guide.
You can also add further documents into the envelope by adding them to the Onboarding settings cog. See also Tenancy Agreement Templates & Mail Merge.
Already Signed:
This is the option for having a tenancy agreement signed outside of COHO and uploaded as already signed. COHO will take no action to seek acknowledgment of any information you have added to COHO.
Wet Signature:
Tenancy agreement is to be printed and signed by the applicant. This can then be scanned and uploaded to COHO. COHO will also seek acknowledgment of the prescribed information you have stored.
After choosing the signing option, you will have a last chance to make any changes:
Use a template / New agreement
Here, you can choose a template AST you have added to COHO or upload a new agreement. ASTs can be pre populated or can be stored on COHO ahead of an onboarding using our mail merge feature. See also Tenancy Agreement Templates & Mail Merge.
Additional Information:
Here, you will see all documents that will be served to the tenant. They will need to click to acknowledge each document in turn before the system will allow them to proceed with the eSignature process.
If you have used the COHO mail merge feature, the next screen will show you if all tags are valid and if there are any errors. You will have the option to 'Preview' the entire document with all information merged, and 'Show All' allows you to see all tags used listed and all information that has been merged.
Move in monies
The move-in-monies step of the onboarding allows you to decide how much money is expected in full from the applicant prior to moving into the property/room. See also GoCardless User Guide for setting up direct debits and collecting Holding Deposits and Move-in-monies.
Here, we can click to ‘Set move-in monies’
The system will look at fields entered previously such as if there was a holding deposit paid and if there is a deposit to be paid.
Here, you can ‘Use existing instructions’ or add ‘New instructions’ as to where you would like the move-in monies to be paid to. Once payment instructions are entered, they can be stored for future onboardings. You can have multiple payment instructions stored so these do not need to be the same as payment instructions for a holding deposit.
The payment reference for the move-in monies can also be entered.
Once the request for move-in-monies has been sent you will be able to confirm receipt:
COHO Deposit Management & TDS API Credentials:
COHO can help you protect the deposit with TDS, a government-approved, award winning, custodial deposit protection scheme.
COHO will register the deposit with TDS automatically, and once they confirm that you have paid over the deposit, we’ll handle the documentation for you. Once the deposit monies have been paid over to TDS and the prescribed information is released, this will be automatically uploaded to the Deposit Management panel for the tenancy. This will include notifying the tenant that it exists.
Getting Started:
To use TDS for custodial deposits with COHO you will need to add your TDS API credentials in the settings of the onboarding panel. See also Onboarding Settings Cog.
Got API Credentials: If you have received your TDS API credentials you can enter them here.
Got a TDS Account: Got an account but no API credentials? You will need to request them by sending an email to - api_enquiries@tenancydepositscheme.com
No TDS Account: Get started right away by creating an account with TDS. You can create an account here - Join TDS Custodial
Follow Up
The Follow Up stage is the last stage of the onboarding. Here, you can add move in details, add an inventory, add financial items or mark the onboarding as complete. You can also pick a date that you wish to follow up with the tenant in the future.
Set move in details:
What shall we call them?: The instructions can be named so they can be recalled for future onboardings.
Move-in details: Here you can give the tenant any further important information regarding moving into the property. This can be where to pick up keys etc.
If you have already set move-in details, they can be stored and used for future onboardings.
+Financial Item: Here you can add a financial item regarding the new onboarding directly to the Finances panel in COHO should you wish to. See also Finances.
+Inventory: See also Inventory Builder & Inventory.
At any stage during the Onboarding workflow, you can add Right to Rent and Deposit Management Information:
+Right to Rent Check: See also Right to Rent.
+Add Deposit Record: See also Deposit Management.
Protect Deposit:

COHO can help you protect the deposit with TDS, a government-approved, award winning, custodial deposit protection scheme.
COHO will register the deposit with TDS automatically, and once they confirm that you have paid over the deposit, we’ll handle the documentation for you. Once the deposit monies have been paid over to TDS and the prescribed information is released, this will be automatically uploaded to the Deposit Management panel for the tenancy. This will include notifying the tenant that it exists.
Getting Started:
To use TDS for custodial deposits with COHO you will need to add your TDS API credentials in the settings of the onboarding panel. See also Onboarding Settings Cog.
Got API Credentials: If you have received your TDS API credentials you can enter them here.
Got a TDS Account: Got an account but no API credentials? You will need to request them by sending an email to - api_enquiries@tenancydepositscheme.com
No TDS Account: Get started right away by creating an account with TDS. You can create an account here - Join TDS Custodial
Onboarding Settings Cog
The Onboarding settings cog can be found on the top right hand corner of the Onboarding panel at organisation level only.
Here you can store your AST templates for future onboardings, you can create your onboarding application forms for future onboardings and set up a TDS account or request credentials from TDS.
Tenancy Agreement Templates & Mail Merge
Example AST Mail Merge Template - ATTACHED TO THIS ARTICLE AT THE BOTTOM OF THIS GUIDE - Please note: This template is NOT to be used under any circumstances. It is for illustrative purposes only.
Click ‘+ New Template’ to add an AST template.
NB: There is an 'i' next to the 'Tenancy Agreement Contract' section. This will give you the latest version of our mail merge document and important information.
Name: Enter the name of the template. This will help you identify which template you need to use during onboarding.
Property: Here you can use the drop down menu to enter if the template is property specific.
Rental Type: Here you can use the drop down menu to enter if the template has a specific rental type. I.e., HMO, single let.
Tenancy Agreement Contract: If you upload a Microsoft Word document (must be docx) and use specific placeholders for the data that already exists in COHO we’ll merge the template with the data and create a PDF document for the tenant to sign.
A selection of COHO data fields are available for you to use in your tenancy agreement template. These cover the applicant/tenant, room/property, tenancy and guarantor.
You should insert them EXACTLY as shown where you want that data to appear in your finished document.
Our mail merge document can be viewed by clicking the 'i' icon next to the tenancy agreement contract file box. It can also be found under the 'Help & Support' section of your side menu.
An easy to follow step-by-step guide to setting up your AST can be found here -
1. Make sure you have a blank AST in docx format
2. Open our mail merge document with the tags and placeholders
3. Copy/paste the tags/placeholders you need into the relevant areas on your AST
4. Save your AST on your pc/laptop
5. Open your COHO account
6. Scroll down to the 'Onboarding' panel on your main portfolio/org page
7. Click the cog in the top right hand corner
8. Click to 'Add a new template'
9. Name the template (this helps you identify it on the onboarding once you need it)
10. Add any additional files and guarantor agreements (if applicable)
11. Copy your AST file (with tags/placeholders added) into the top box named 'Tenancy Agreement Contract'
12. Click to save
Additional Files: You can also include any additional files you wish to forward to the tenant for them to sign against. I.e., GDPR statements, house rules etc.
Guarantor Agreement: Here you can include a guarantor agreement. This can also be used in conjunction with the COHO mail merge.
Click ‘add’ to add the template or ‘cancel’ to cancel the template.
COHO Assured Tenancy Agreements
Three solicitor-reviewed tenancy Assured Tenancy Agreements are now FREE on every active COHO account.
More information can be found here - Your new tenancy agreements are ready.
You can download yours now by clicking on the Onboarding Settings cog:
Onboarding Application Forms
Onboarding Application forms can be set up ahead of completing an onboarding and stored via the Onboarding settings cog.
+Add form
Application form name: Enter the name of the application form. This will help you identify which application form you need to use during onboarding.
Mandatory Questions: Forename, Surname, Email and Mobile Number are mandatory questions and are always set for every form.
Optional Questions: Checkbox options include: Date of birth, Gender, Current address, National Insurance Number, Next of Kin, Current Landlord details, copies of recent bank statements, Proof of Identification and Collect Right to Rent Proof.
History: Checkbox options include: Ever bankrupt, Any CCJs and Any criminal record.
Employment details: Checkbox options include: Employment type & annual income and Employment Status.
Add additional questions: Here you can add as many additional questions as you wish.
Additional files: Here you can include any files related to the application process during the onboarding.
Consent & Declaration: See the full wording for Consent & Declaration below:
Declaration Wording:
NB. The application form cannot be submitted without consent being ticked.
Click ‘create’ to create the application form or ‘cancel’ to cancel.
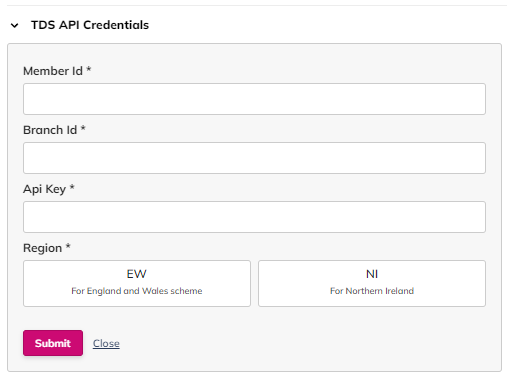
TDS API Credentials
If you have a TDS account already, email - api_enquiries@tenancydepositscheme.com to get your credentials. Otherwise, get started by creating an account - Join TDS Custodial
Add: Enter the information provided to you by TDS.
Related Articles
Using COHO Tenancy Agreements
This guide explains how to set up and use COHO’s solicitor-approved tenancy agreement templates within the onboarding process. These templates include the required merge fields and tags needed for automatic population during onboarding. 1. Download ...Introduction
COHO 2024 Brochure - COHO Brochure What is COHO? COHO is a property management system for HMOs, single lets and co-living properties. The system assists property managers in all aspects of day-to-day management from finding and onboarding tenants to ...Occupancy
The Occupancy panel in COHO allows you to see all tenants and their AST dates, units, tenancy changes and renewals all in one place with various filtering options. Units Units > All Units: Here you can view all properties, room numbers, rent amounts, ...Glossary
API: Application Programming Interface. Applicant: Word used to describe a prospective tenant going through the onboarding process. AST (tenancy agreement): Assured Shorthold Tenancy. CC: or Carbon Copy is the header used to enter an email address ...TDS User Guide
What is TDS? TDS is one of the main deposit protection scheme in the UK https://www.tenancydepositscheme.com/. Using it from COHO will use their custodial scheme, and is free of charge. Setting up TDS The set-up of the integration between TDS and ...