Tenant Onboarding Dashboard
This guide is specifically aimed at Tenants going through the Onboarding Process on COHO.
You have had a viewing with your letting agent or landlord and have shown an interest in moving ahead with a tenancy. This guide will help you understand the process of going through an Onboarding, what the Onboarding dashboard looks like and how you can interact with the different stages.
Accept the Invite
Your letting agent or landlord will have sent you an invite to your email address and mobile number you have supplied. You will need to click the link and follow the registration process to begin the Onboarding. Once the Onboarding is complete, you will have access to your entire My COHO dashboard which will be covered in another guide.
Click to 'Begin Process' or copy and paste the URL supplied into your browser.
You will now need to create a password to begin the registration process:
Once a password has been entered, you'll be asked to verify your email address. A code will be sent to the email address provided.
Complete Registration
You will now be asked to complete a short registration process.
Once the fields have been completed click 'Continue'.
Would you mind telling us a bit more about you?
Click 'That's fine, continue'
Here you can indicate if you're a Professional or a Student.
Professional:
Student:
Click 'Continue'
A little about me...
Click 'Continue'
Click 'Submit'
My Onboardings
You will now be able to view the entire Onboarding process. You will find important information here about the property, your move-in date, the rent amount, information about any bills and any deposit information.
Each section of the Onboarding process can be clicked to expand the information.
Red - Means there is something you need to complete.
Orange - Means you are waiting for the manager to complete a step.
Green - Means the step is complete.
Reserve the room
If the manager has requested a Holding Deposit, you will be able to expand the section and see the information required to pay the holding deposit:
Click 'Pay holding deposit'
If a draft copy of the tenancy agreement has been supplied, you can view this here. You may also be requested to accept further Terms and Conditions.
To move forward with the tenancy you will need to pay the Holding Deposit using the information supplied and ensure any check boxes have been checked.
Once the Holding Deposit has been paid, click 'Acknowledge Documents & Mark as Paid'.
The manager will now to confirm receipt of payment.
Application Form
If the manager has requested an Application Form to be completed, you will now be asked to complete the form. It is important that you complete the form honestly, in full and do not miss any required fields as this could impact the tenancy and delay your move-in.
Click to 'Provide Information Requested'
Click 'Next'
Please note, depending on what information is requested, the following fields may differ.
You will also be asked to confirm the information provided is true and accurate. If the manager is requesting to complete a reference check, you will also be asked to confirm your consent for the check to be completed.
Click 'Save'
The Application Form step is now complete
Referencing
If the manager has indicated that they require a reference check to be completed, you will see this on the Reference Check step as In Progress until this is completed.
Tenancy Agreement
You will now be asked to sign the tenancy agreement and any compliance documents.
Click to expand the Tenancy Agreement step.
Here, you will be able to view the 'Proposed rent schedule' for your tenancy:
Click 'View & sign tenancy agreement' or click 'Proposed tenancy agreement'
Here, you can 'View' and 'Download' the tenancy agreement before signing
Click 'Continue'
You will first be asked to 'Acknowledge' all compliance documents, the latest How to Rent Guide and any other prescribed information that has been supplied to you. You can 'View' and 'Download' all documents but these will also be available to you once the Onboarding is completed.
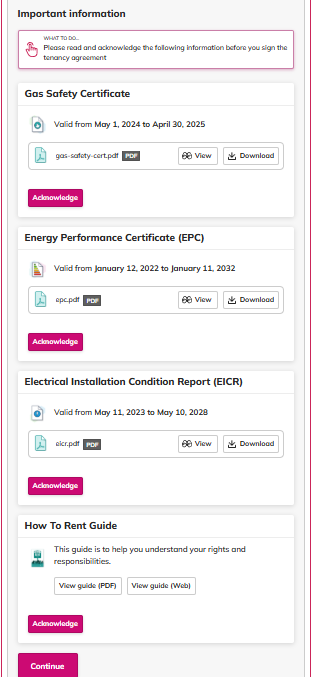
Once they have all be acknowledged, you can click 'Continue'
Before you sign the tenancy agreement, you will be asked to confirm your identity. This can be done via email or SMS.
Once you have verified your identity, you can now sign the tenancy agreement
Sign the tenancy agreement by adding your signature to the signature box. Click 'Continue' once you are finished.
You will then be asked to confirm you have read and acknowledged the tenancy agreement and any supporting documents. You will also be asked to confirm your password. This is the password you created when registering.
The Tenancy Agreement step is now complete
Pay the move-in money
If the manager has requested a deposit and / or the first months rent, you may need to pay move-in monies.
Here you will be able to see how much is needing to be paid and where the money needs to be paid to.
Once you have paid the move-in money, you can click 'Mark as paid'. The manager will then confirm receipt of the payment.
Move in
Once the manager has confirmed receipt of the move in monies, you'll see the final step of the Onboarding process.
The manager may give you further instructions before moving into the property such as where to collect keys etc. Once the manager confirms that the Onboarding has finished, you'll then have access to your full My COHO Dashboard.
Please see Tenants My COHO Dashboard.
Related Articles
Tenant Viewings
This guide is specifically aimed at Tenants going through the Viewing Process on COHO. Your letting agent or landlord will enter your details onto their account and you will receive an email inviting you to begin the viewing process: You can click ...Property Owner Dashboard
Quick Access: Actions: Clicking ‘Actions’ will navigate you to the Actions panel on your dashboard. Maintenance: Clicking 'Maintenance' will navigate you to the Maintenance panel on your dashboard. Rent Collection: Clicking 'Rent Collection' navigate ...Tenants My COHO Dashboard
Once you have been onboarded into a property or room you will have access to your My COHO Dashboard. In this guide, we'll go through the different panels you have access to and how they work. Menu Header At the very top of your account you will have ...